
A forum post I once stumbled across summed up this whole topic perfectly. A driver had found a generic timing belt diagram online, matched it loosely to his engine, and started disassembling the front of his motor over a weekend. By Sunday night, he was stuck — the diagram he’d found didn’t quite match his engine’s actual layout, and he’d already loosened the crankshaft pulley without marking anything first. He ended up towing the car to a shop anyway, except now the job cost more because the mechanic had to untangle a partially disassembled engine before even starting the actual repair.
That story is exactly why this guide exists: to help you genuinely understand a timing belt diagram — what it shows, how to read it, and the general shape of the process behind how to take off timing belt components and put them back correctly — while being honest about where a real repair manual and a professional installer need to take over. If you want the full mechanical explanation of how this part works, our companion guide, Timing Belt Explained: What Is a Timing Belt and What Does It Do?, covers that in depth.
Timing Belt Location: What a Timing Belt Diagram Actually Shows
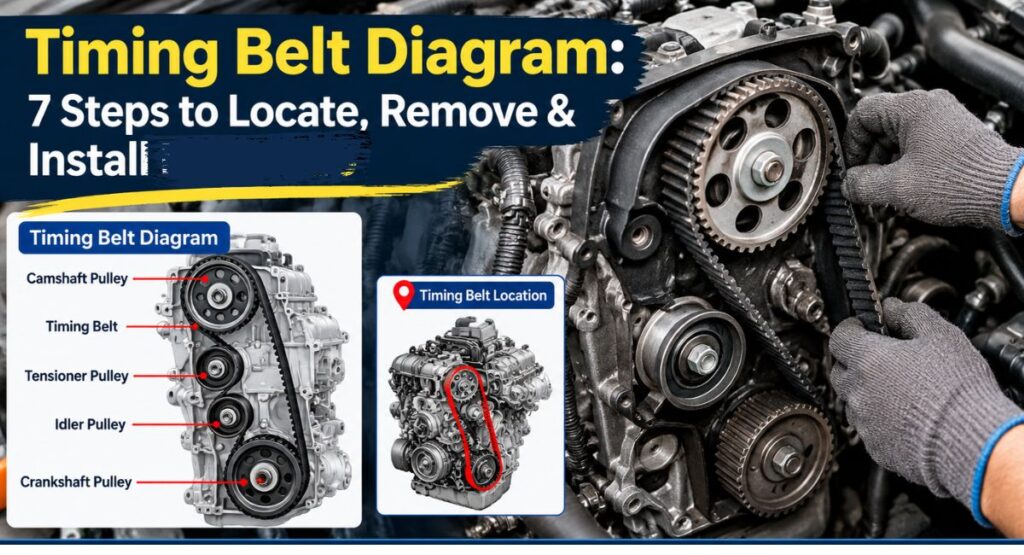
A typical timing belt diagram is a front-facing illustration of your engine with the timing cover removed, showing every pulley the belt wraps around. According to Mechanic.com.au’s breakdown of a labeled timing belt diagram, a standard diagram typically marks:
- The crankshaft sprocket (usually at the bottom, driving the whole system)
- One or two camshaft sprockets (at the top, controlling valve timing)
- The tensioner pulley and idler pulleys, which guide and maintain correct belt tension
- The water pump pulley, on engines where the timing belt also drives it
- Directional arrows showing which way the crankshaft rotates
- Timing marks — small notches, dots, or lines on each pulley that must align precisely with matching marks on the engine itself before the belt goes on
That last point is the single most important thing on the entire diagram, and it’s worth understanding why.
How to Read the Diagram: Timing Marks Are Everything
Every pulley in the system has a timing mark, and every timing mark has a corresponding fixed reference point on the engine block or cover. Before the old belt comes off, and again before the new one goes on, every single one of these marks must line up exactly — this is what keeps your crankshaft and camshaft(s) rotating in the precise relationship your engine’s valves and pistons depend on.
Repair documentation for this exact reason repeatedly includes a critical warning: once the timing belt is removed, never rotate the crankshaft or camshafts independently of each other, since doing so on an interference engine can cause the pistons and valves to collide even with the belt off, simply from turning the wrong pulley at the wrong moment. This is precisely the kind of detail a generic diagram won’t warn you about, but a proper factory service manual for your specific engine will.
How to Remove a Timing Belt: The General Process to Replace Car Timing Belt Systems
Here’s the honest, high-level shape of the process to replace car timing belt systems — presented as a conceptual overview, not a substitute for your engine’s specific factory instructions, which include exact torque specifications and special tools.
How to Take Off a Timing Belt (Stages 1–4)
Stage 1: Disconnect the battery and remove access components. This typically means the serpentine belt, various covers, and sometimes engine mounts or brackets, just to reach the timing cover.
Stage 2: Set the engine to top dead center (TDC) on cylinder one. This is done by rotating the crankshaft until the crankshaft’s timing mark aligns with its reference point — the essential starting position before anything else happens.
Stage 3: Confirm and record every timing mark’s position. Many mechanics photograph or physically mark each pulley’s alignment before removing the belt, as a reference for reinstallation.
Stage 4: Loosen the tensioner and remove the old belt. With tension released, the belt comes off the pulleys — and from this point on, nothing gets rotated independently until the new belt is on.
How to Install a Timing Belt: Putting It Back Together Correctly
Stage 5: Install the new belt in the correct routing and direction. Following the diagram’s arrows, the belt goes back on in the exact sequence and orientation as the original, typically starting at the crankshaft.
Stage 6: Re-tension the belt and re-verify every timing mark. This is checked, and often double-checked, before the engine is ever rotated by hand or started — a single mark out of place at this stage is exactly what causes engine damage.
Stage 7: Reassemble covers and components, then rotate the engine by hand before starting it. Turning the engine over manually first confirms nothing binds or collides before you actually attempt to start it.
Why This Isn’t a Universal DIY Job
It’s worth being direct about this: the seven stages above describe the shape of the process, but the actual specifications — exact torque values, special locking tools for holding the camshafts and crankshaft in place, and the precise timing mark locations — are different for nearly every engine. A real factory timing belt procedure includes specific torque figures down to the individual bolt, and often calls for dedicated locking pins or tools designed for that exact engine.
This is precisely why a generic diagram found online, without your engine’s specific service manual, is a genuinely risky starting point for a DIY attempt — as the driver in our opening story discovered. A mismatched timing mark, a bolt torqued incorrectly, or a belt installed one tooth off on the sprocket can cause the exact catastrophic engine damage this component exists to prevent.
Why It’s Worth Trusting a Proper Manual and a Professional Installer
Given how much precision this job demands, this is genuinely one of the clearest cases in car maintenance where paying for expertise is worth every penny. A qualified mechanic working from your vehicle’s exact factory service manual — with the correct specialty tools already on hand — removes nearly all the risk described above. If you’re set on understanding or attempting this yourself, invest first in your exact engine’s official repair manual rather than relying on a generic diagram, and consider having a professional perform the actual reassembly even if you handle the teardown yourself.
Final Thoughts
A timing belt diagram is genuinely useful for understanding what’s happening under your hood — the pulleys, the marks, the general flow of the job — but it’s an educational tool, not a substitute for the exact specifications your specific engine requires. For the signs that tell you it’s time for this job in the first place, see When to Change a Timing Belt? 7 Essential Signs & Replacement Tips, and for real pricing on having it done properly, see Timing Belt Replacement Cost in 2026: What Should You Pay?. Understanding the diagram is the easy part — getting every mark exactly right is where professional experience genuinely earns its cost.
For everything else your car needs on a regular schedule, our Complete Guide to Car Maintenance: What to Check and When covers it in full.
Frequently Asked Questions
Can I replace a timing belt myself?
Technically, yes — it’s mechanically possible for an experienced DIYer with the right tools. But this is genuinely one of the highest-risk jobs in car maintenance to attempt without proper preparation. Success depends entirely on having your exact engine’s factory service manual (for correct torque specs and timing mark locations), the specific locking tools many engines require to hold the crankshaft and camshafts in place, and the discipline to never rotate those components independently once the belt is off. A single misaligned timing mark or an incorrectly torqued bolt can cause the exact catastrophic engine damage — bent valves, damaged pistons, a cracked cylinder head — that this component exists to prevent, particularly on interference engines. If you have specific experience with this exact job and the right specialty tools, it’s realistic. If you’re attempting it for the first time based on a generic online diagram alone, the risk generally outweighs the labor savings for most drivers.
What destroys a timing belt?
A few factors, working alone or together, are the usual culprits:
Age and heat cycling — rubber degrades over time from engine heat, regardless of mileage, which is why belts have a time-based interval alongside a mileage one.
Oil or coolant contamination — a leak near the timing cover can soak into the belt material and accelerate breakdown significantly.
A failing tensioner or idler pulley — if these components wear out, they can’t maintain correct belt tension, causing abnormal wear or slipping even on an otherwise healthy belt.
Simply running past the manufacturer’s interval — the single most common cause of failure is a belt that’s been left in service well beyond its recommended mileage or time limit.
Incorrect installation — a belt installed one tooth off on a sprocket, or under incorrect tension, can wear unevenly or fail prematurely even if it’s brand new.
How much does it cost to replace a timing belt?
Across independent cost-estimating sources, the average lands around $880 to $1,300 for a complete job including parts and labor, though the realistic range runs from about $400 on the low end to $2,500 or more on the high end, depending on your specific vehicle, engine layout, and whether the water pump is bundled in. Labor typically makes up 60-70% of that total, since reaching the belt usually requires removing several other components first — which is also why most shops recommend replacing the tensioner, idler pulleys, and water pump at the same time, since the labor to access them is already being paid for regardless.
How many hours does it take to replace a timing belt?
At a professional shop, most timing belt jobs take 3 to 8 hours of labor, with the majority falling in the 4 to 6 hour range for typical passenger vehicles. According to AutoZone’s cost breakdown, labor on most timing belts runs 3-5 hours; more complex engines — V6 layouts, tight engine bays, or jobs that include the water pump — can push that to 6-8 hours or more. Here’s the counterintuitive part: the actual swap of the belt itself only takes a matter of minutes. The vast majority of that labor time is spent removing and reassembling everything around the belt just to reach it, which is exactly why this job costs what it does even though the part itself is inexpensive. For a first-time DIYer, realistically budget a full day or more — 6 to 12+ hours — to account for research, careful double-checking of timing marks, and the slower pace of doing it without prior experience.