Bad rotors rarely show up quietly. A friend of mine described the moment hers went bad as feeling like she’d suddenly driven onto a highway rumble strip, except the shaking came up through the brake pedal instead of the steering wheel, and it only happened when she slowed down. She’d been putting off a brake noise for weeks, assuming it was “just the pads.” It wasn’t. Her rotors had worn unevenly, and by the time she got them checked, both needed replacing instead of a simple resurface.
If you’ve ever searched bad rotors reddit looking for a real answer instead of a dozen conflicting guesses from strangers, that’s exactly the gap this guide is here to close. Our companion article, How to Check Brake Pads: 7 Easy Steps to Measure Thickness & Spot Wear, covers the pads themselves in detail. This one focuses purely on the rotors: the nine signs that tell you they’re going bad, how to check them yourself, and when resurfacing still makes sense versus when replacement is the only real option.
What Rotors Actually Do
Every time you press the brake pedal, your caliper squeezes the brake pads against a spinning metal disc called the rotor, and that friction is what actually slows the car down. Rotors take an enormous amount of heat and stress with every stop, and over time, that heat and friction wear them down, warp them, or damage the surface in ways that reduce how well they can do their job.
How to Tell If a Brake Rotor Is Bad: 9 Signs and Symptoms
1. A Pulsing or Vibrating Brake Pedal
This is the single most common and most reliable sign of rotor trouble. According to Bumper’s brake rotor guide, what most drivers describe as a “warped rotor” is technically disc thickness variation, meaning the rotor’s thickness varies slightly across its face. As the pads clamp down, they catch the thicker and thinner sections in rotation, creating that pulsing feeling under your foot.
2. The Steering Wheel Shakes When You Brake
If the shaking shows up in the steering wheel rather than the pedal, it usually points to the front rotors specifically, especially at highway speeds. Rear rotor problems tend to transmit through the pedal or the seat and floor instead. Either way, a repeatable shake during normal braking, not just after one hard stop, is a rotor problem worth checking.
3. Grinding or Scraping Noises
A grinding sound while braking often means the pad material has worn through to the metal backing plate, which is now grinding directly into the rotor surface. It can also mean the rotor itself is scored deeply enough to be chewing into new pads. Either way, this isn’t something you should put off and hope it resolves on its own.
4. Squealing That Isn’t Coming From the Pad Wear Indicator
Most pads have an intentional metal wear indicator that squeals on purpose once they’re thin. But squealing can also come from a warped or unevenly worn rotor interacting poorly with the pad surface, so it’s worth a visual check rather than assuming every squeal means the same thing.
5. Visible Grooves or Scoring on the Surface
Pull a wheel and look at the rotor’s braking surface. According to PowerStop’s guide to bad rotor signs, a healthy rotor should look relatively smooth. Deep, circular grooves you can catch a fingernail on mean the surface has been damaged, usually from debris trapped against the pad or from pads worn down to bare metal.
6. Blue or Discolored Patches
A bluish tint on the rotor’s surface is a sign of significant overheating, often from prolonged hard braking, riding the brakes on a long descent, or a caliper that’s sticking and dragging constantly. Heat-damaged rotors lose some of their structural integrity even if they still look mostly intact otherwise.
7. Visible Cracks
Small hairline cracks radiating from the center of the rotor, or heavier cracking across the surface, are a clear and non-negotiable replacement sign. A cracked rotor has lost structural strength and carries a real risk of a piece breaking away under heavy braking.
8. Uneven or Unusually Fast Pad Wear
If your brake pads keep wearing down faster than expected, or wearing unevenly from one side to the other, a warped or rough rotor surface is a common hidden cause. A damaged rotor doesn’t give the pad a clean, even surface to grip, which accelerates and unevens the pad’s own wear pattern.
9. Rotor Thickness at or Below the Minimum Spec
This is the sign you can’t always feel or see, which is exactly why measuring matters. Every rotor has a minimum thickness specification, often stamped directly on the rotor’s edge or hub, or listed in your service manual. Once a rotor wears down to that number, it must be replaced, regardless of how it looks or feels, since a too-thin rotor can’t safely dissipate heat and is more prone to cracking or warping.
What Does a Bad Rotor Look Like? Visual Signs vs. Felt Symptoms
Signs of bad rotors generally split into two categories: what you can see, and what you can feel or hear while driving. Both matter, and relying on only one can leave you with a false sense of security.
Visual signs of bad rotors (what a damaged rotor actually looks like):
- Deep, circular grooves or scoring across the braking surface
- A bluish or straw-colored discoloration from heat
- Visible cracks, whether hairline or more pronounced
- A raised lip or ridge around the outer edge where the pad doesn’t reach
- Rust pitting across the surface, especially after a car has sat unused
- A surface that looks uneven or wavy rather than flat and smooth
Felt and heard symptoms (what bad rotors sound and feel like from the driver’s seat):
- A pulsing brake pedal
- A shaking steering wheel at speed
- Grinding, scraping, or an unusual squeal
- A longer stopping distance than normal
- A vibration that comes and goes with brake pressure, not constantly
If you’re trying to answer what do bad brakes look like as a whole system rather than just the rotor, remember that worn pads, a damaged rotor, or both together can all contribute to the same symptoms, which is exactly why checking both components side by side matters.
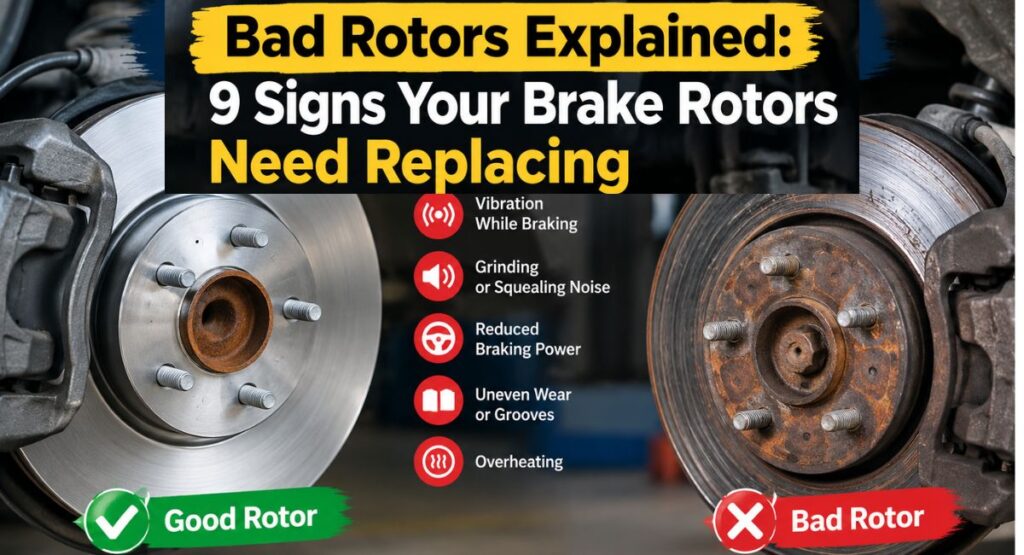
Good Rotors vs. Bad Rotors: A Side-by-Side Comparison
Sometimes the easiest way to judge worn rotors vs new ones is a direct comparison. Here’s what separates good rotors from a rotor that needs attention:
| Feature | Good Rotor | Bad Rotor |
|---|---|---|
| Surface | Smooth, consistent, matte gray | Grooved, scored, or glazed |
| Color | Even gray tone | Blue, straw, or rust-colored patches |
| Thickness | Well above minimum spec | At or near minimum spec |
| Edge | Flat, no buildup | Raised lip or ridge |
| Cracks | None | Hairline or visible cracking |
| Pedal feel | Smooth, consistent | Pulsing or throbbing |
| Steering wheel | Steady | Shakes under braking |
| Pad wear | Even across the pad | Uneven or unusually fast |
If most of your rotor’s answers land in the “good” column, you likely just need pads. If several land in the “bad” column, plan on rotor replacement rather than resurfacing.
What Causes Bad Rotors?
Understanding what causes bad rotors helps explain why they fail in the first place, and sometimes how to prevent it next time:
- Heat cycling — repeated hard braking, towing, or mountain driving generates extreme heat that can warp or discolor rotors over time.
- Worn-out pads left too long — once pad material is gone, the metal backing plate grinds directly into the rotor, scoring it quickly.
- Debris trapped against the pad — small rocks or road grit caught between the pad and rotor can gouge the surface.
- A sticking caliper — a caliper that doesn’t release fully causes constant, low-level friction and heat buildup, accelerating wear unevenly.
- Corrosion from sitting idle — a car parked for a long time, especially in humid or salty climates, can develop surface rust on the rotors.
- Low-quality replacement rotors — cheaper rotors with less heat tolerance and consistency are simply more prone to premature warping and wear.
Brake Pads vs. Rotor: How to Tell Which One Is the Problem
Since brake pads vs rotor symptoms can overlap, it helps to know which clues point where. A squeal, by itself, usually points to the pad’s wear indicator. A pulsing pedal or shaking wheel points much more specifically to the rotor. Grinding can come from either, once pads are worn through. The most reliable way to know for certain is checking both: measure the pad thickness using our brake pad guide, then visually inspect and measure the rotor using the steps below.
Step-by-Step: How to Check Your Rotors Yourself
Step 1: Park on level ground and let the brakes cool completely. Never inspect rotors right after driving, since they can be extremely hot.
Step 2: Look through the wheel spokes with a flashlight first. You can often see the rotor’s edge and general surface condition without removing the wheel, similar to the quick check covered in our brake pad guide.
Step 3: Remove the wheel for a full visual inspection. Use jack stands, never a jack alone, and look across the entire braking surface for grooves, discoloration, or cracks.
Step 4: Run a finger (carefully) along the surface. A smooth surface should feel even. Catching on a groove with your fingernail is a clear sign of scoring.
Step 5: Check for the stamped minimum thickness spec. It’s usually stamped into the rotor’s hat or edge. If you have a micrometer or brake rotor gauge, measure the actual thickness and compare it directly.
Step 6: Take it for a test drive if the car is safe to drive. Brake gently at moderate speed and pay attention to any pulsing in the pedal or shaking in the wheel, then repeat at highway speed if conditions are safe.
Step 7: Write down what you find before deciding on resurfacing or replacement. Having actual measurements and specific observations makes the next conversation with a mechanic far more productive than just saying “it feels weird.”
Resurface or Replace? Why 2026 Leans Toward Replacement
For years, resurfacing (having a machine shop shave a thin layer off the rotor to restore a flat surface) was the default answer for worn rotors. That’s shifted. Many modern rotors are manufactured thinner than older designs, specifically to save weight and cost, which leaves very little material margin for resurfacing without dropping below the minimum spec. Combine that with new rotors being genuinely inexpensive for most vehicles, and many shops now recommend replacement over resurfacing in the majority of cases.
Resurfacing can still make sense if your rotor is well above minimum thickness, shows only light, even wear, and has no cracks or heat damage. But if you’re already close to the minimum, showing cracks, or dealing with heat discoloration, replacement is the only safe option, since resurfacing further thins a rotor that has little margin left.
What Rotor Replacement Actually Costs
Pricing varies a fair amount depending on your vehicle and whether pads are replaced at the same time, but the numbers consistently cluster in a similar range. According to ConsumerAffairs’ 2026 cost breakdown, replacing pads and rotors together commonly runs $900 to $1,100 per axle at many shops, though independent shops using quality aftermarket parts frequently come in lower, often somewhere in the $250 to $700 per axle range depending on the vehicle.
| Job | Typical Cost (Per Axle) |
|---|---|
| Rotor resurfacing (per rotor, labor only) | $25 – $60 |
| New economy rotors (parts only, pair) | $60 – $150 |
| Rotors + pads, independent shop | $250 – $700 |
| Rotors + pads, dealership | $700 – $1,200+ |
| Luxury/performance vehicles | $500 – $1,500+ |
Since the caliper and pads have to come off regardless of which job you’re doing, labor overlaps significantly between a pads-only job and a pads-plus-rotors job. That’s exactly why most mechanics recommend doing both together once either one needs attention, rather than paying for the same labor twice within a few months.
Common Mistakes When Judging Rotor Condition
A few habits lead drivers to the wrong conclusion about their rotors:
- Assuming every pedal pulse means new rotors are needed. Mild pulsing right after one long, hard stop (coming down a mountain, for example) can be temporary heat distortion that fades once the rotors cool. A pulse that repeats on ordinary, everyday stops is the real warning sign.
- Judging rotors by sound alone. Squealing usually comes from the pad’s wear indicator, not the rotor, so a quiet brake doesn’t guarantee a healthy rotor and a squealing one doesn’t guarantee a bad one.
- Skipping the measurement. A rotor can look fine to the eye while sitting right at its minimum thickness. Only a direct measurement against the stamped spec tells you for certain.
- Replacing only the obviously bad rotor. Most shops recommend replacing both rotors on an axle together, even if only one shows heavy wear, so braking stays balanced side to side.
- Assuming resurfacing is always cheaper. Once labor is factored in, resurfacing sometimes saves only $100 to $150 compared to a new economy rotor, which may not be worth it if the rotor is already close to its limit.
DIY or Professional?
Brake rotor replacement is a moderately approachable DIY job for someone comfortable with basic tools and jack stand safety, since it largely involves removing the caliper, swapping the rotor, and reinstalling everything correctly. That said, brakes are a safety-critical system, and a caliper reinstalled incorrectly or a bolt under-torqued has real consequences. If you’re not fully confident in the process, having a professional handle the actual swap, even after you’ve done your own inspection and measurement, is a reasonable and safe choice.
Choosing Quality Rotors and a Trusted Shop Pays Off
Not all rotors are built the same, and this is genuinely one area where the cheapest option often costs you twice. Bargain rotors can warp faster, wear unevenly sooner, and generate more brake dust and noise. Choosing a reputable mid-grade or OEM-equivalent rotor, paired with quality pads, gives your braking system a much better chance of wearing evenly and lasting through its full expected lifespan. Ask your mechanic which brand they’re installing and why, request to see the actual thickness measurement before authorizing replacement, and don’t hesitate to ask whether resurfacing is genuinely still an option for your specific rotors or whether you’re already too close to the limit. A shop willing to show you the numbers is one worth trusting with something this important.
Final Thoughts
Bad rotors send fairly clear signals once you know what to look and feel for: a pulsing pedal, a shaking wheel, grinding, visible grooves, blue discoloration, cracks, uneven pad wear, or a thickness reading that’s crept toward the minimum. None of these require expert-level knowledge to notice, just a little attention and, ideally, the habit of checking alongside your brake pads rather than waiting for a dramatic symptom to force the issue.
For the full picture of your braking system, see our companion guide on checking brake pads, and for everything else your car needs on a regular schedule, our Complete Guide to Car Maintenance: What to Check and When covers it in full. Like my friend learned the hard way, a little attention to both the pads and the rotors together saves you from a much bigger, and much shakier, surprise down the road.
Frequently Asked Questions
Can you still drive with bad rotors?
Technically, yes, for a short time, but it comes with real risk, and how much risk depends on how bad the rotors actually are. Mild warping that just causes a faint pulse under light braking is less urgent than a rotor that’s cracked, scored deep enough to catch a fingernail, or discolored from serious heat damage. The core problem with driving on bad rotors is that your stopping distance increases and becomes less predictable, since the rotor can’t deliver even, consistent friction against the pad. A cracked rotor also carries a small but real risk of a piece breaking away under hard braking. If you’re dealing with mild pulsing only, it’s reasonable to drive cautiously to a shop. If you’re seeing grinding, deep cracks, or a rotor at or below its minimum thickness, treat it as a “get this fixed now” situation rather than a “drive carefully for a while” one.
How do I know if my rotors need replacing?
Look for a combination of felt, heard, and visual signs rather than relying on just one. The clearest felt symptom is a pulsing or throbbing brake pedal, especially at higher speeds, or a shaking steering wheel if the front rotors are affected. On the sound side, grinding or scraping often means metal is contacting the rotor directly. Visually, check for deep grooves, a bluish discoloration from heat, visible cracks, or a raised lip around the outer edge where the pad doesn’t reach. The most definitive answer, though, comes from measurement: every rotor has a minimum thickness spec stamped on its edge or hub, and once a rotor is at or below that number, it needs replacing regardless of how it looks or feels. If you want a clear visual comparison, lining up what you’re seeing against a simple good-versus-bad checklist (smooth and even versus grooved, cracked, or discolored) usually makes the answer obvious pretty quickly.
What do rotors do when they go bad?
As rotors wear down, warp, or get damaged, they lose their ability to give the brake pads a clean, flat, consistent surface to grip. A rotor with uneven thickness causes the pedal to pulse as the pads catch the thicker and thinner sections in rotation. A scored or grooved rotor reduces the actual contact area between pad and rotor, cutting down on effective braking force. A heat-damaged or cracked rotor loses structural integrity and dissipates heat less effectively, which can make it warp or crack further under continued hard use. On top of the direct braking performance loss, a bad rotor also accelerates wear on the pads themselves, since they’re no longer riding against a smooth, even surface, meaning a neglected rotor problem often ends up costing you new pads sooner than expected, too.
How expensive is it to replace rotors?
Costs vary by vehicle and whether pads are replaced at the same time, but the typical ranges break down like this:
Rotor resurfacing (labor only, if the rotor qualifies): roughly $25 to $60 per rotor
New economy rotors (parts only, per axle): roughly $60 to $150
Rotors and pads together at an independent shop: roughly $250 to $700 per axle
Rotors and pads at a dealership: often $700 to $1,200 or more per axle
Luxury or performance vehicles: commonly $500 to $1,500+ per axle
Because the caliper and pads already have to come off to access the rotor, most of the labor cost is shared between a pads-only job and a pads-plus-rotors job, which is exactly why mechanics usually recommend doing both together rather than paying for that same labor twice within a short window.