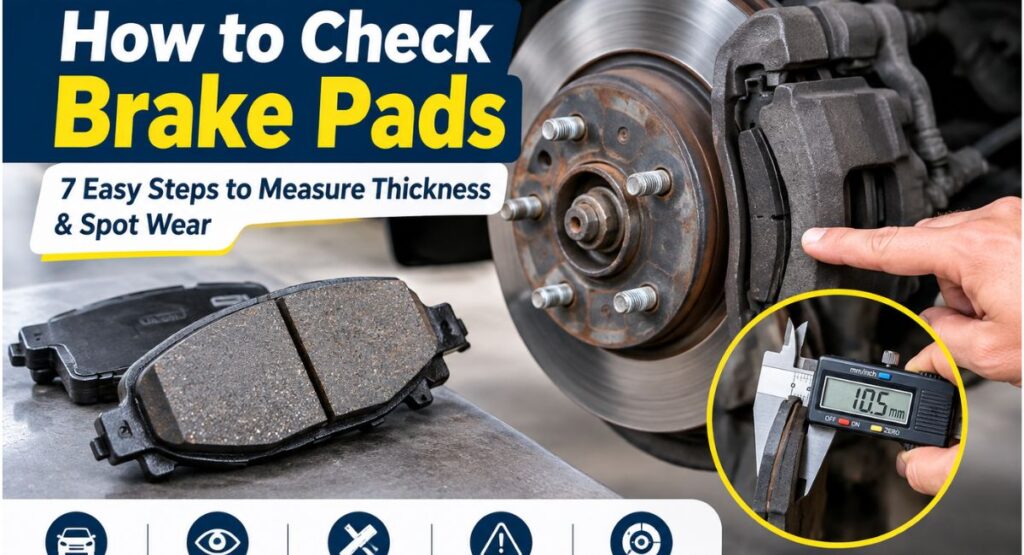
How to check brake pads is one of those skills that sounds like it belongs in a mechanic’s garage, but it honestly takes about five minutes, a flashlight, and a little curiosity. A neighbor of mine, Dave, learned this the hard way. He was filling up at a gas station one evening, glanced through his front wheel with his phone flashlight just to see what was in there, and noticed one brake pad looked barely thicker than a stack of two credit cards. He booked a service the next morning. His mechanic measured it at about 2 mm and said, “Another few weeks and we’d be replacing the rotors too.” One quick look saved him a much bigger bill.
That’s the whole idea behind this guide. Checking your brake pads doesn’t take a mechanic’s training, and it doesn’t call for any expensive equipment. We’ll walk through seven easy steps, from a quick peek through your wheel to an exact brake pad thickness measurement, plus how to read what you’re seeing. If you want the bigger picture of how brakes fit into your regular upkeep, our Complete Guide to Car Maintenance: What to Check and When covers every system in detail.
Where Are Brake Pads Located? A Quick Orientation
To check them, it first helps to know exactly where to find them. On most modern cars, the brake pads sit inside each wheel, tucked behind the wheel and tire. Each wheel with disc brakes has a shiny metal disc called the rotor that spins with the wheel, and a clamp-shaped part called the caliper that straddles the edge of the rotor. Two pads sit inside the caliper, one on each side of the rotor. When you press the brake pedal, the caliper squeezes the pads against the rotor, and that friction slows the car.
Front wheels are usually the easiest to see into, because the openings are bigger. Many cars have disc brakes on all four wheels, but some models, especially older or budget ones, use drum brakes at the rear. Drum brakes work differently: curved brake shoes push outward against the inside of a drum instead of pads squeezing a disc. This guide focuses on disc brake pads, the type most drivers will check.
Why Checking Your Brake Pads Matters
Your brake pads are the parts that press directly against your rotors to bring the car to a stop. With every stop, a tiny bit of pad material rubs away. Over time, that material gets thin, and once it does, the pads can’t create enough friction to stop your car as quickly as they should. That’s not just an inconvenience. It’s a genuine safety issue.
There’s also a money reason. When pads wear all the way down to the metal backing plate, that metal starts grinding into the rotor and can quickly carve grooves into it. What could have been a simple pad swap turns into a pad and rotor replacement, which costs noticeably more. Regular checks are about the cheapest protection you can get.
The Tools You’ll Need: How to Check Brake Pads at Home
You really don’t need much for the basic check:
- A flashlight (your phone light works fine)
- A small ruler or a brake pad gauge for a more exact reading
- A lug wrench, a jack, and jack stands, only if you decide to take the wheel off
- A notepad or your phone for writing down what you see
If you’re only doing the quick “look through the spokes” check in steps one through three, you can skip everything except the flashlight.
How to Inspect Brake Pads: 7 Easy Steps
Step 1: Park Safely on Level Ground
Start with the basics. Pull onto a flat, even surface, shut off the engine, and engage the parking brake. Give the brakes a few minutes to cool down if you’ve just been driving, since they can get very hot. If you plan to remove a wheel later, it’s also smart to chock (block) the wheels that stay on the ground.
Step 2: Turn the Steering Wheel and Look Through the Spokes
Turn your steering wheel fully to one side so the front wheel angles outward. This gives you a better view into the wheel opening. Then shine your flashlight through the gaps in the wheel and look for the brake rotor (the shiny metal disc) and the caliper (the clamp-like part sitting over it). The brake pads are the flat blocks of friction material pressed against either side of the rotor.
According to Bourke Brothers Auto Repair’s inspection guide, this quick visual check through the wheel is a perfectly good way to spot obvious problems without removing anything.
Step 3: Estimate the Thickness
Now look at how much pad material is left. Most new brake pads start out around 10 to 12 mm thick, or roughly half an inch. As a simple rule of thumb, if what you can see looks thinner than about a quarter inch (around 6 mm), start planning for a replacement, and if it looks thinner than about an eighth of an inch (roughly 3 mm), it’s time to replace them right away. Use the chart later in this article to match what you’re seeing to an action.
Step 4: Take the Wheel Off for a Closer Look (Optional, But Worth It)
If your wheel design blocks the view of the pads, or you’d like a more accurate look, take the wheel off. Follow the safe order that guides like Haynes’ brake pad thickness guide recommend:
- Set the car on level ground, wedge blocks against the wheels, and pull the parking brake on.
- Give the lug nuts a slight loosening before the car leaves the ground.
- Lift the car with a jack and rest it securely on jack stands. Never work under or around a car that’s held up by a jack alone.
- Undo the lug nuts fully and take the wheel off.
Once the wheel is off, you can usually see the edge of the pad clearly through the caliper opening.
Step 5: Measure the Pad Thickness
Now put a number on it. You can hold a small ruler against the pad’s friction material (the part that’s not the metal backing plate) or use a brake pad gauge or caliper for a precise reading. Measure only the friction material, not the metal backing behind it. If you can see or measure only one of the two pads on that wheel, assume the other is worn at least as much, since the inner pad often wears faster and is harder to see.
Step 6: Look for Uneven Wear and Rotor Damage
Thickness isn’t the only thing to check. Compare the pad’s thickness from one end to the other to spot uneven wear. If one edge is much thinner than the other, that can point to a sticking caliper or slide pin. Then look at the rotor surface. It should look fairly smooth. Deep grooves, a blue-tinged discoloration, or a raised lip around the outer edge suggest the rotor needs attention too.
Step 7: Repeat on Every Wheel and Write It Down
Brake wear can be different from wheel to wheel, and front brakes usually wear faster than rear brakes because they do most of the stopping. Check each wheel, jot down your measurements, and note the date and mileage. Having a simple record makes it easy to see how quickly your pads are wearing and to predict when you’ll need new ones.
How to Check Brake Pads Without Removing Wheel (Front and Rear)
For a routine check, you often don’t need to take a wheel off at all. Here’s how to check front brake pads without removing wheel, and the rear ones too:
- Pull onto a flat, level spot, shut off the engine, and put on the parking brake.
- For the front wheels, turn the steering wheel fully to one side so the wheel angles outward and gives you a bigger view.
- Shine your flashlight through the wheel spokes and find the caliper and the edge of the pad pressed against the rotor. The outer pad is the easiest one to see.
- Compare the visible friction material to the metal backing plate behind it. If the friction material looks thinner than about a quarter inch (6 mm), start planning a replacement. If it looks closer to an eighth of an inch (3 mm) or less, replace the pads right away.
- Move to the rear wheels. The openings there are often smaller, so a phone camera held through the gap or a small inspection mirror can help you see what your eyes can’t.
One important limit: this method only shows the outer pad. If the outer pad is already close to the limit, or your wheel design blocks the view, take the wheel off for a proper look. As Haynes’ guide notes, if you can only see one pad, assume the other one is worn at least as much.
How to Check Brake Pad Thickness: Brake Pad Measurement Methods Compared
There’s more than one way to do a brake pad measurement, and the right choice depends on how exact you need to be. Here’s how the main methods compare:
| Method | Wheel Off? | Accuracy | Best For |
|---|---|---|---|
| Looking through the spokes | No | Rough estimate | Quick monthly checks |
| Phone camera or inspection mirror | No | Rough estimate | Rear wheels with small openings |
| Ruler held against the pad | Yes | Good | Simple DIY measurement |
| Brake pad gauge | Usually | Very good | Repeatable readings |
| Digital or vernier caliper | Yes | Most precise | Exact numbers to track over time |
When you measure brake pad thickness with a ruler or caliper, keep three rules in mind. Measure only the friction material, not the steel backing plate. Measure at the thinnest point you can find, since pads often wear unevenly. And write down the smallest reading, then compare it to the minimum in your owner’s manual. That final comparison is what turns a number into a decision.
How to Check Brake Pads With Gauge: Using a Brake Pad Gauge
A brake pad gauge is a small, inexpensive hand tool that makes measuring simpler and more repeatable than guessing with a ruler. Most are a thin metal strip with stepped edges or marked millimeter sizes, though designs vary, so always follow the directions that come with yours. In general, here’s how it works:
- Remove the wheel (or use the caliper opening if the pad edge is clearly visible).
- Hold the gauge against the edge of the pad’s friction material, not the backing plate.
- Find the step or mark that matches the pad’s thickness and read the number.
- Check both pads on that wheel, and check a few points along each pad.
- Write the smallest reading down and compare it to your car’s minimum.
Bock Auto’s brake pad guide describes a gauge as the way to get a more precise reading than a purely visual check. If you want even more precision, a digital caliper can typically read to a hundredth of a millimeter, though that’s usually more detail than a driver needs.
How Thick Brake Pads Should Be: Brake Pad Thickness Chart
So, how thick brake pads should be when new? Most start around 10 to 12 mm. Here’s a quick reference so you can match your measurement to an action. These figures line up with what most brake guides and manufacturers recommend, though your owner’s manual has the final say for your specific car.
| Thickness (mm) | Thickness (inches) | Condition | What to Do |
|---|---|---|---|
| 10–12 mm | ⅜” – ½” | New / excellent | Drive normally |
| 6–8 mm | ¼” – ⁵⁄₁₆” | Good to fair | Keep monitoring, start planning |
| 4–6 mm | ⁵⁄₃₂” – ¼” | Worn | Schedule replacement soon |
| 3–4 mm | ⅛” – ⁵⁄₃₂” | Critical | Replace immediately |
| Under 3 mm | Under ⅛” | Dangerous | Don’t keep driving on them |
A useful detail from AUTODOC’s brake pad guide: once linings get thinner than about 3 mm, the pads can no longer generate enough friction to slow the car quickly enough. There’s no single federal minimum in the US, but in the UK the legal minimum is 1.5 mm, which is a good reminder that you really don’t want to run pads anywhere near that thin.
Check Brake Pad Wear: Signs Your Brake Pads Are Wearing Out
Even between inspections, your car will usually tell you when the pads are getting low. Watch for:
- A high-pitched squeal when braking. Many pads have a small metal wear indicator built in that squeals on purpose once the pad gets thin. Consider it a built-in early warning.
- A grinding or scraping sound. This usually means the pad material is gone and metal is meeting metal. Get it checked right away.
- A vibrating or pulsing brake pedal. This can mean unevenly worn pads or rotors that have been affected by heat or wear.
- A pull to one side as you brake.
- A longer stopping distance or a soft brake pedal that sinks more than it used to.
- A brake warning light on the dashboard, on cars with electronic pad-wear sensors.
If you hear grinding or your brakes feel noticeably different, don’t wait for your next scheduled checkup. Have them looked at promptly. For more on what different brake sounds and other engine-bay warning signs usually mean, our guide to Vehicle Maintenance Issues: 10 Common Problems and Simple Solutions covers squealing brakes in detail.
How to Check If Brake Pads Are Worn: A 60-Second Test
Short on time? Here’s a quick way to check if brake pads are worn using your eyes, ears, and feet:
- Look: Shine a flashlight through the wheel. Does the friction material look thin, uneven, or close to the metal backing plate?
- Listen: Do you hear a squeal or a grinding sound when you brake gently?
- Feel: Does the pedal pulse or feel softer, does the car pull to one side, or does it take longer to stop?
If two or more of these answers are “yes,” don’t guess. Have the pads measured properly, or follow the steps above to measure them yourself.
Beyond the Pads: How to Check Your Brakes
Pads are the most common wear item, but they’re not the whole system. When you want to check your brakes more fully, add these quick checks:
- Brake fluid: Find the brake fluid reservoir under the hood and check that the level sits between the MIN and MAX lines. Very dark fluid can be a sign it’s due for a change, and it’s typically flushed roughly every two years.
- Pedal feel: The pedal should feel firm. A spongy or sinking pedal needs professional attention right away.
- Rotors: Look for deep grooves, discoloration, or a raised lip on the outer edge.
- Parking brake: It should hold the car firmly on a gentle slope.
- Warning lights: Never ignore a brake or ABS light on the dashboard.
For a full maintenance schedule that includes brakes alongside everything else, see our Complete Guide to Car Maintenance: What to Check and When.
How to Check Brake Pads on a Toyota Corolla
The steps in this guide work on a Corolla just like any other car, but a few model-specific details are worth knowing. Front disc brakes are standard, so the through-the-spokes check works well on the front wheels. Rear brakes are where it gets tricky: depending on the generation, some older Corollas (around the mid-2000s) had rear drum brakes with shoes instead of pads, while other generations use rear discs. Check which type you have before you start.
On thickness, Toyota’s own service specs for many Corolla generations list a fairly generous new pad thickness (roughly 11 to 12 mm at the front) and an absolute minimum of about 1 mm. That 1 mm figure is the point of no return, not a target. Mechanics generally recommend replacing pads around 3 mm, well before you reach it. Specs differ between generations, so confirm the exact numbers in your owner’s manual for your year and trim.
How Much Are Brake Pads? Typical Costs Per Axle
Cost is a big part of why people ask how much are brake pads, so here’s a realistic breakdown. Prices vary by car, pad type, and location, but most 2026 sources land in a similar range:
| What You’re Paying For | Typical Cost (Per Axle) |
|---|---|
| Brake pads only (parts) | $30 – $150 |
| Pads replaced at an independent shop (parts and labor) | $150 – $300 |
| Pads and rotors replaced together | $300 – $600 |
| Pads only at a dealership | $250 – $450 |
A per axle price covers both wheels on the front or the rear. According to Brakes To Go’s 2026 cost guide, a fair pads-only brake job lands around $195 to $300 per axle, while adding rotors pushes it to roughly $425 to $700. Luxury, performance, and large truck brakes cost more. The takeaway is the same one Dave learned: catch thin pads early and you stay in the cheaper row of that table.
Brake Pad Check Frequency: How Often Should You Do It?
A good habit is to check them at every tire rotation, or at least once a year. If you do lots of stop-and-go city driving, tow heavy loads, or drive in hilly areas, check more often, since those conditions wear pads faster. As a rough lifetime guide, Consumer Reports notes that pads and rotors are commonly replaced somewhere in the range of 25,000 to 50,000 miles, though driving style and pad type make a big difference.
Checking Brake Pads: Common Mistakes to Avoid
A few easy slip-ups can make a check less useful, or less safe:
- Measuring the metal backing plate along with the pad. The backing plate is roughly 5 mm of steel that doesn’t count. Only the friction material matters.
- Checking only one wheel. Front and rear pads wear at different rates, so a good front reading tells you nothing about the rear.
- Relying on sound alone. Some pads have no built-in squealer, and a quiet brake isn’t proof of a healthy one.
- Working under a car supported only by a jack. Always use jack stands.
- Ignoring the rotors. Perfect pads on a badly grooved rotor still means a problem worth fixing.
Avoiding these keeps your inspection accurate and keeps you safe while you’re doing it.
DIY or Professional: What Makes Sense?
Checking your brake pads is a very reasonable DIY task. The visual check through the wheel is safe and simple, and taking a wheel off to measure is manageable as long as you use jack stands and follow proper safety steps. Actually replacing pads is a step up: it involves compressing the caliper piston, handling brake components, and getting everything reassembled correctly, and brakes are not a system where you want to guess. If you’re not fully comfortable, letting a qualified mechanic handle the replacement is a smart call, even if you did the inspection yourself. Knowing your measurement before you walk in also helps you have a much more confident conversation about what needs doing.
Why It’s Worth Choosing Quality Brake Pads and a Trusted Mechanic
Once you know your pads are due, the parts and the shop you choose really matter. Cheap, bargain-bin pads can wear out faster, make more noise, and create more dust, and because brakes are a safety system, this is not the place to cut corners. Look for pads from reputable manufacturers that match your car’s specifications, and ask your mechanic about the pad material (for example, ceramic versus semi-metallic) and which suits how you drive. Ask about the warranty on both parts and labor, check reviews, and don’t hesitate to ask your mechanic to show you the old pads and explain what they found. A shop that’s happy to walk you through the measurements is one you can trust with something as important as your ability to stop.
Final Thoughts
Learning how to check brake pads is one of the simplest, most valuable habits a driver can build. A flashlight, a few minutes, and the seven steps above are enough to catch thin pads long before they become a safety problem or a rotor-destroying repair. Like Dave at the gas station, you might just save yourself a much bigger bill with one curious glance.
For everything else your car needs on a regular schedule, see our Complete Guide to Car Maintenance: What to Check and When, and for more habits that keep small problems from becoming big ones, check out Vehicle Preventative Maintenance: 10 Essential Tips for a Reliable Car. Your brakes work hard every single drive, so it’s worth giving them five minutes of attention in return.
Frequently Asked Questions
How can you tell your brake pads have worn down?
A few signs, alone or together, usually point to worn pads. The clearest is a high-pitched squeal when you brake gently, which is a built-in wear indicator doing its job on purpose. Grinding or scraping is more serious and usually means the friction material is gone and metal is meeting metal. Beyond sound, watch for a soft or sinking pedal, a longer stopping distance, a pulse or vibration through the pedal, the car pulling to one side, or a dashboard brake warning light on cars with electronic sensors. None of these need to happen all at once to be worth acting on. If you catch even one, follow up with a visual check or a measurement rather than waiting for the rest to show up too.
What’s the best way to check brake pads yourself at home?
There’s no need for a lift or a complete set of tools. The quickest method is a flashlight and a look through the wheel: turn the steering wheel so the front wheel angles outward, shine the light through the spokes, and find the rotor and caliper. The pad’s friction material sits pressed against either side of the rotor, and you can judge its thickness against the metal backing plate behind it. For a more exact number, take the wheel off using jack stands for safety, then measure the pad with a ruler, a brake pad gauge, or a caliper, reading the friction material alone rather than including the backing plate. New pads run about 10 to 12 mm; once you’re seeing 3 mm or less, it’s time to replace them.
How do you tell whether it’s the brake pads or the rotors that need replacing?
Pads and rotors wear differently and don’t always fail together, so it helps to check both. If the pads measure thin but the rotor surface still looks smooth and even, with no deep grooves, discoloration, or a raised outer lip, you likely just need pads. Rotors usually need replacing alongside pads if you see grooves you can catch a fingernail on, a bluish heat-discolored patch, a pulsing brake pedal or steering wheel under braking (a common sign of warped rotors), or if the pads were left to wear all the way to the metal backing plate, since that metal-on-metal contact damages the rotor surface quickly. Generally speaking, pads tend to wear down sooner and in a more predictable pattern, while rotor damage more often shows up as a knock-on effect of neglected pads or from excess heat and warping.
Is it possible to inspect brake pads with the wheel still on?
Yes, for a routine check. Turn the steering wheel fully to one side on the front wheels to open up the view, then shine a flashlight through the wheel spokes to see the outer pad pressed against the rotor. It’s a solid option for a fast, everyday check that tends to reveal any obvious issues early on. It does have a real limit, though: you’re only seeing the outer pad, and rear wheels often have smaller openings that make this harder. If the outer pad looks close to worn, or you want an exact measurement rather than an estimate, taking the wheel off is the more reliable option.
How to know if rotors are bad?
Look and feel for a few specific things. Visually, check for deep, catchable grooves cut into the rotor surface, a bluish or discolored patch from overheating, or a lip or ridge built up around the outer edge where the pad doesn’t reach. While driving, a warped or damaged rotor typically causes a pulsing or vibrating sensation through the brake pedal, and sometimes through the steering wheel, when you brake, especially at higher speeds. A grinding noise can also mean a rotor has been ground down by metal-to-metal contact from fully worn pads. If you notice pulsing or visible damage, have the rotors measured against your car’s minimum thickness specification, since a rotor that’s been machined too many times or worn too thin needs replacing rather than resurfacing.
Can AutoZone measure brake pads?
Yes. According to AutoZone’s own site, their free Brake Check service has a technician visually inspect the brake system and measure brake pad thickness, along with checking the rotors, calipers, and brake fluid level and condition. This is offered at no cost at their stores, and separately, some AutoZone locations also offer a diagnostic tool called Fix Finder that can pull brake pad life information directly from a vehicle’s computer on models that support it, though that specific data isn’t available on every car. Either way, if you want a second opinion or don’t have tools of your own, a free AutoZone brake check is a reasonable option before deciding whether to replace the pads yourself or head to a shop.